THIS BLOG IS FOR SOLVING ANY TYPE OF PROBLEM OF HUMAN BEING. WE TRY TO FIX ANY TYPE OF PROBLEM WITH YOU.
Google Search
Saturday, July 23, 2011
Thursday, July 14, 2011
Wednesday, July 13, 2011
Wednesday, June 29, 2011
Five tips for removing viruses and spyware
1: Isolate the drive
Many rootkit and Trojan threats are masters of disguise that hide from the operating system as soon as or before Windows starts. I find that even the best antivirus and antispyware tools -- including AVG Anti-Virus Professional, Malwarebytes Anti-Malware, and SuperAntiSpyware -- sometimes struggle to remove such entrenched infections.
You need systems dedicated to removal. Pull the hard disk from the offending system, slave it to the dedicated test machine, and run multiple virus and spyware scans against the entire slaved drive.
2: Remove temporary files
While the drive is still slaved, browse to all users' temporary files. These are typically found within the C:\Documents and Settings\Username\Local Settings\Temp directory within Windows XP or the C:\Users\Username\App Data\Local\Temp folder within Windows Vista.
Delete everything within the temporary folders. Many threats hide there seeking to regenerate upon system startup. With the drive still slaved, it's much easier to eliminate these offending files.
3: Return the drive and repeat those scans
Once you run a complete antivirus scan and execute two full antispyware scans using two current, recently updated and different anti-spyware applications (removing all found infections), return the hard disk to the system. Then, run the same scans again.
Despite the scans and previous sanitization, you may be surprised at the number of remaining active infections the anti-malware applications subsequently find and remove. Only by performing these additional native scans can you be sure you've done what you can to locate and remove known threats.
4: Test the system
When you finish the previous three steps, it's tempting to think a system is good to go. Don't make that mistake. Boot it up, open the Web browser, and immediately delete all offline files and cookies. Next, go to the Internet Explorer Connection settings (Tools | Internet Options and select the Connections tab within Internet Explorer) to confirm that a malicious program didn't change a system's default proxy or LAN connection settings. Correct any issues you find and ensure settings match those required on your network or the client's network.
Then, visit 12 to 15 random sites. Look for any anomalies, including the obvious popup windows, redirected Web searches, hijacked home pages, and similar frustrations. Don't consider the machine cleaned until you can open Google, Yahoo, and other search engines and complete searches on a string of a half-dozen terms. Be sure to test the system's ability to reach popular anti-malware Web sites, such as AVG, Symantec, and Malwarebytes.
5: Dig deeper on remaining infections
If any infection remnants persist, such as redirected searches or blocked access to specific Web sites, try determining the filename for the active process causing the trouble. Trend Micro's HijackThis, Microsoft's Process Explorer, and Windows' native Microsoft System Configuration Utility (Start | Run and type msconfig) are excellent utilities for helping locate offending processes. If necessary, search the registry for an offending executable and remove all incidents. Then, reboot the system and try again.
If a system still proves corrupt or unusable, it's time to begin thinking about a reinstall. If an infection persists after all these steps, you're likely in a losing battle.
Other strategies
Many rootkit and Trojan threats are masters of disguise that hide from the operating system as soon as or before Windows starts. I find that even the best antivirus and antispyware tools -- including AVG Anti-Virus Professional, Malwarebytes Anti-Malware, and SuperAntiSpyware -- sometimes struggle to remove such entrenched infections.
You need systems dedicated to removal. Pull the hard disk from the offending system, slave it to the dedicated test machine, and run multiple virus and spyware scans against the entire slaved drive.
2: Remove temporary files
While the drive is still slaved, browse to all users' temporary files. These are typically found within the C:\Documents and Settings\Username\Local Settings\Temp directory within Windows XP or the C:\Users\Username\App Data\Local\Temp folder within Windows Vista.
Delete everything within the temporary folders. Many threats hide there seeking to regenerate upon system startup. With the drive still slaved, it's much easier to eliminate these offending files.
3: Return the drive and repeat those scans
Once you run a complete antivirus scan and execute two full antispyware scans using two current, recently updated and different anti-spyware applications (removing all found infections), return the hard disk to the system. Then, run the same scans again.
Despite the scans and previous sanitization, you may be surprised at the number of remaining active infections the anti-malware applications subsequently find and remove. Only by performing these additional native scans can you be sure you've done what you can to locate and remove known threats.
4: Test the system
When you finish the previous three steps, it's tempting to think a system is good to go. Don't make that mistake. Boot it up, open the Web browser, and immediately delete all offline files and cookies. Next, go to the Internet Explorer Connection settings (Tools | Internet Options and select the Connections tab within Internet Explorer) to confirm that a malicious program didn't change a system's default proxy or LAN connection settings. Correct any issues you find and ensure settings match those required on your network or the client's network.
Then, visit 12 to 15 random sites. Look for any anomalies, including the obvious popup windows, redirected Web searches, hijacked home pages, and similar frustrations. Don't consider the machine cleaned until you can open Google, Yahoo, and other search engines and complete searches on a string of a half-dozen terms. Be sure to test the system's ability to reach popular anti-malware Web sites, such as AVG, Symantec, and Malwarebytes.
5: Dig deeper on remaining infections
If any infection remnants persist, such as redirected searches or blocked access to specific Web sites, try determining the filename for the active process causing the trouble. Trend Micro's HijackThis, Microsoft's Process Explorer, and Windows' native Microsoft System Configuration Utility (Start | Run and type msconfig) are excellent utilities for helping locate offending processes. If necessary, search the registry for an offending executable and remove all incidents. Then, reboot the system and try again.
If a system still proves corrupt or unusable, it's time to begin thinking about a reinstall. If an infection persists after all these steps, you're likely in a losing battle.
Other strategies
Thursday, June 16, 2011
MOVE YOUR MOUSE POINTER WITHOUT MOUSE
Moving the pointer without a mouse..!
Ever thought that you could move your mouse pointer without your mouse..? No, not really, isn't it..? But, it's possible..!
Here is how:
1.Press Left Alt + Left Shift + Num Lock Button and click OK in the dialogue box that appears.
2.In your Taskbar, a mouse-like icon will appear. Double click it and under "Mouse" tab, make sure that the "Use Mouse Keys" is checked.
3.Also ensure that the Num Lock is ON (ie. the light must glow).
2.Now with the help of Numeric Keypad e.g ( Press and Hold the following Keys )
7 8 9
4 6
1 2 3
For normal click, press 5
Interesting, isn't it? You can also change settings under the "Mouse" tab in "Accessibility Options", by clicking on Settings
LOCK YOUR COMPUTER BY PRESSING 2 KEYSTROKS
IF YOU WANT TO GO ANYWHERE WHILE WORKING ON COMPUTER & YOU DONT WANT TO SHUT DOWN YOUR COMPUTER FOR ANY REASON THEN YOU CAN LOCK YOUR COMPUTER SO NO ONE CAN OPERATE YOUR COMPUTER IN YOUR ABSANCE.
IF YOU HAVE CRATED YOUR USER NAME & PASSWORD FOR WINDOWS THEN YOU CAN LOCK YOUR COMPUTER BY PRESSING ONLY TWO KEYSTROKES. YOU DON'T NEED TO LOG OFF IT..
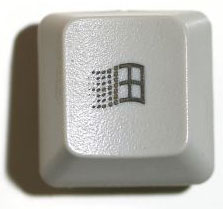
PRESS WINDOW KEY + L
YOUR COMPUTER WILL BE LOCKED. THEN YOU CAN GO ANY WHERE FOR YOUR WORK.
LESSER KNOWN WORD SHORCUTS - VERY IMPORTANT
The shortcuts
Keystroke Function
Ctrl + Shift + D ------: Double underline the selected text
Ctrl + ] ------: Increase the size of selected text by 1 point
Ctrl + [ ------: Decrease the size of selected text by 1 point
Ctrl + Shift + A ------: Make selected text all caps
Ctrl + = ------: Toggle subscripting for selected text
Ctrl + + ------: Toggle superscripting for selected text
Ctrl + Shift + Q ------: Apply Symbol font to selected text
Ctrl + Shift + N ------: Apply Normal style to current paragraph
Ctrl + Alt + 1 ------: Apply Heading 1 style to current paragraph
Ctrl + Alt + 2 ------: Apply Heading 2 style to current paragraph
Ctrl + Alt + 3 ------: Apply Heading 3 style to current paragraph
Ctrl + Shift + L ------: Apply List Bullet style
Ctrl + 0 (zero) ------: Apply or remove space above current paragraph
Subscribe to:
Posts (Atom)